Zone Trade Indicator MT5: Mastering Market Zones for Profitable Trades
In the fast-paced world of forex and CFD trading, having a reliable technical indicator can mean the difference between consistent profits and frustrating losses. Among the most powerful tools available for MetaTrader 5 (MT5) traders is the Zone Trade Indicator, a dynamic tool designed to identify key support and resistance levels, predict price reversals, and streamline trade execution. Whether you’re a novice trader seeking clarity or a seasoned professional aiming to refine your strategy, understanding how this indicator works—and how to leverage its full potential—can transform your trading approach. In this comprehensive guide, we’ll explore what the Zone Trade Indicator is, why it’s essential for modern trading, how to implement it effectively, and proven strategies to maximize your returns.
What Is the Zone Trade Indicator?
The Zone Trade Indicator is a custom technical analysis tool built for MT5 that visualizes critical market zones where price action is likely to reverse or accelerate. Unlike traditional indicators that rely solely on moving averages or oscillators, Zone Trade focuses on price congestion areas—regions where buyers and sellers have historically clashed, creating “zones” of support or resistance. These zones act as invisible barriers, guiding traders on when to enter, exit, or hold positions.
At its core, the indicator combines elements of volume analysis, price action, and trend identification to generate clear buy/sell signals. It highlights zones with distinct colors (e.g., green for bullish zones, red for bearish zones) and marks entry/exit points with arrows, making it intuitive even for beginners. By filtering out noise and focusing on high-probability zones, the Zone Trade Indicator reduces emotional decision-making and increases confidence in trades.
Why Traders Rely on the Zone Trade Indicator
The forex and CFD markets are driven by supply and demand imbalances, and the Zone Trade Indicator excels at pinpointing these imbalances. Here’s why it’s a favorite among MT5 users:
- Simplifies Complex Analysis:
Instead of manually drawing support/resistance lines or calculating Fibonacci retracements, the indicator automates zone detection. This saves time and eliminates human error, especially during volatile market conditions. - Enhances Risk Management:
By identifying precise entry and stop-loss levels within zones, traders can set tighter risk/reward ratios. For example, entering a long position near a green zone with a stop-loss just below the zone minimizes exposure while maximizing profit potential. - Adapts to All Timeframes:
Whether you’re day trading on the 15-minute chart or swing trading on the daily timeframe, the Zone Trade Indicator adjusts to your style. It works seamlessly across forex pairs (EUR/USD, GBP/JPY), commodities (gold, oil), and indices (S&P 500, DAX). - Reduces False Signals:
Traditional oscillators like RSI often generate false overbought/oversold readings. The Zone Trade Indicator, however, filters these by requiring price to interact with a validated zone before triggering a signal, resulting in more reliable trades. - Compatible with Multiple Strategies:
From scalping to trend following, the indicator integrates effortlessly with popular trading methods. Pair it with moving averages for trend confirmation or use it alone for counter-trend trades—its versatility makes it a staple in any trader’s toolkit.
How the Zone Trade Indicator Works
To harness the power of the Zone Trade Indicator, it’s crucial to understand its underlying mechanics. Here’s a breakdown of how it operates:
Key Components
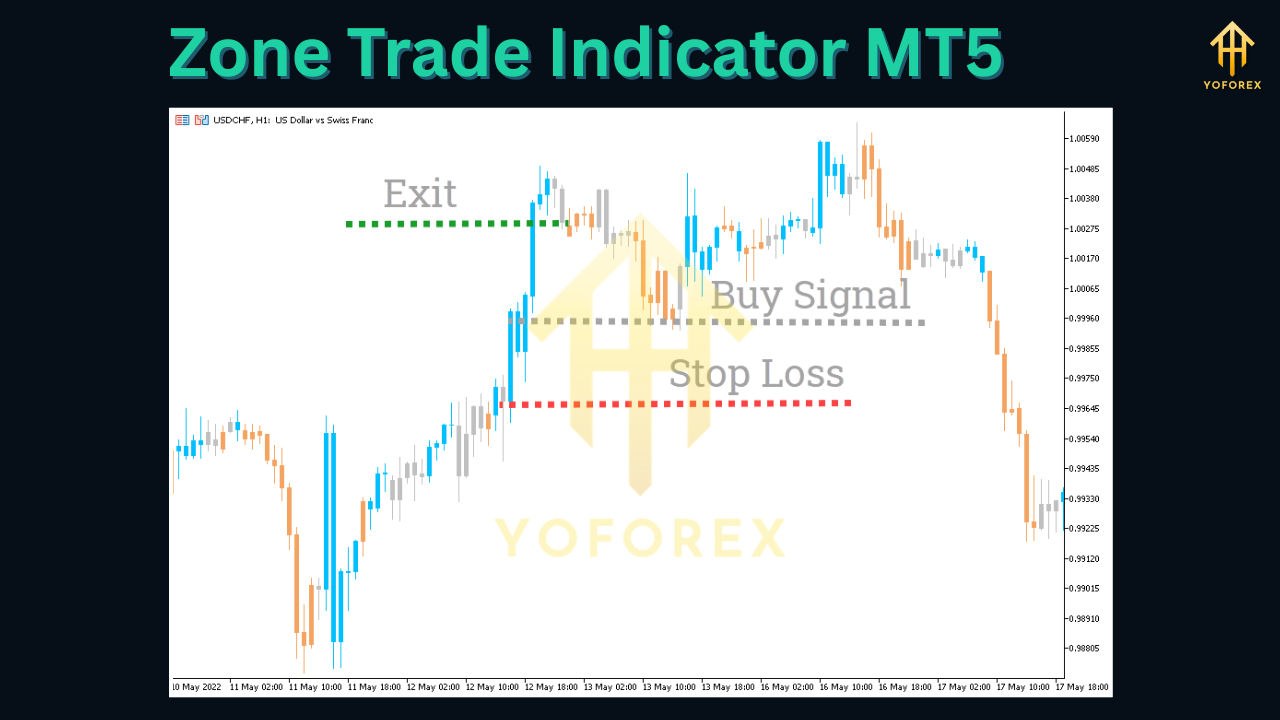
- Zone Detection: The indicator scans historical price data to identify areas where price has repeatedly bounced off (support) or reversed from (resistance). These zones are marked with colored rectangles—green for bullish (buy zones) and red for bearish (sell zones).
- Entry Signals: When price approaches a zone and shows signs of reversal (e.g., a candlestick pattern like a hammer or doji), the indicator generates an arrow signal. A green arrow indicates a buy opportunity, while a red arrow suggests a sell.
- Stop-Loss and Take-Profit Guidance: The indicator automatically suggests stop-loss levels just outside the opposite zone (e.g., below a green zone for long positions) and take-profit targets at the next major zone or based on a predefined risk/reward ratio.
Interpreting Signals
- Bullish Zone (Green): Price is approaching a green zone from below. Look for confirmation (e.g., a bullish candlestick closing above the zone) before entering a long position.
- Bearish Zone (Red): Price is approaching a red zone from above. Wait for a bearish candlestick (e.g., a shooting star) to close below the zone before shorting.
- False Signals: If price breaks through a zone without reversing (e.g., a green zone is broken downward), the indicator may adjust the zone or generate a new signal. Always confirm with additional indicators (e.g., MACD, volume) to avoid whipsaws.
Features
The Zone Trade Indicator for MT5 comes packed with features designed to enhance usability and performance:
- Customizable Zone Colors: Adjust the color of bullish/bearish zones to match your chart theme or personal preference.
- Alerts: Set pop-up, email, or push notifications for when price reaches a zone, ensuring you never miss a trading opportunity.
- Timeframe Flexibility: Apply the indicator to multiple timeframes simultaneously (e.g., 1-hour and 4-hour charts) to confirm trends.
- Risk/Reward Calculator: Input your desired risk percentage, and the indicator will calculate optimal position sizes and take-profit targets.
- Historical Backtesting: Test the indicator on past market data to evaluate its performance before live trading.
Step-by-Step Guide: Installing and Setting Up the Zone Trade Indicator
Getting started with the Zone Trade Indicator is straightforward. Follow these steps to integrate it into your MT5 platform:
-
Download the Indicator:
Obtain the Zone Trade Indicator file (usually a.ex5or.mq5file) from a reputable source (e.g., the official developer’s website or trusted trading forums). -
Install in MT5:
- Open your MT5 terminal.
- Click
File>Open Data Folder. - Navigate to the
MQL5folder, then open theIndicatorssubfolder. - Copy the downloaded indicator file into this folder.
-
Apply to Chart:
- Restart MT5 (if prompted).
- Open a chart (e.g., EUR/USD).
- Click
Insert>Indicators>Custom> select the Zone Trade Indicator. - Configure settings (see below) and click
OK.
-
Optimize Settings:
The default settings work for most traders, but you can customize them for your strategy:- Zone Sensitivity: Increase/decrease the number of bars the indicator analyzes to detect zones. Higher sensitivity captures more zones but may increase false signals.
- Alerts: Enable/disable sound or visual alerts for entry signals.
- Color Scheme: Change zone colors to improve visibility on your chart.
Proven Trading Strategies Using the Zone Trade Indicator
To maximize the Zone Trade Indicator’s effectiveness, combine it with these battle-tested strategies:
1. Trend Following with Zone Confirmation
- Setup: Use a 200-period simple moving average (SMA) to identify the overall trend.
- Entry: Wait for price to pull back to a green zone (in an uptrend) or red zone (in a downtrend). Enter when the indicator generates a confirming arrow.
- Exit: Take profits at the next major zone or use a trailing stop to lock in gains.
Example: In an uptrend on EUR/USD, price pulls back to a green zone. The Zone Trade Indicator issues a buy arrow. You enter a long position, place a stop-loss below the zone, and target the next green zone 50 pips away.
2. Counter-Trend Trading
- Setup: Identify overextended markets using the RSI (above 70 for overbought, below 30 for oversold).
- Entry: Wait for price to reach a red zone (overbought) or green zone (oversold). Enter when the indicator’s arrow aligns with the counter-trend direction.
- Exit: Exit when price reaches the opposite zone or use a fixed take-profit.
Caution: Counter-trend trading carries higher risk. Only use this strategy in ranging markets and with strict risk management.
3. Scalping with Zone Breakouts
- Setup: Focus on 1-minute or 5-minute charts for quick entries.
- Entry: Wait for price to break through a zone (e.g., a green zone breakout upward) and immediately enter in the direction of the breakout.
- Exit: Take profits quickly (e.g., 5-10 pips) or use a small trailing stop.
Tip: Scalpers should prioritize liquidity and avoid trading during low-volume periods (e.g., Asian session).
Tips for Effective Trading with the Zone Trade Indicator
Even the best indicators fail without proper discipline. Follow these tips to boost your success rate:
- Combine with Other Indicators:
Use the Zone Trade Indicator alongside momentum indicators (e.g., MACD) or volume tools (e.g., On-Balance Volume) to confirm signals. For example, a buy signal from the Zone Trade Indicator is stronger if the MACD line crosses above the signal line. - Manage Risk Religiously:
Never risk more than 1-2% of your account per trade. The Zone Trade Indicator helps by providing clear stop-loss levels—use them! - Backtest Before Live Trading:
Test the indicator on historical data using MT5’s Strategy Tester. This reveals its win rate, drawdown, and optimal settings for your preferred market. - Avoid Overtrading:
The Zone Trade Indicator generates signals frequently, but not all are worth acting on. Wait for high-probability setups (e.g., zones aligned with trend directions) to avoid churning your account. - Stay Updated:
Developers occasionally release updates to improve the indicator’s accuracy. Check for new versions regularly and adjust your settings as needed.
Common Mistakes to Avoid
- Ignoring Market Context: Zones are powerful, but they don’t work in isolation. Always consider news events (e.g., Fed announcements) or macroeconomic factors that could override technical signals.
- Chasing Losses: If a trade goes against you, don’t double down. Accept the loss and wait for the next valid setup.
- Overcomplicating Settings: Stick to default parameters unless backtesting proves otherwise. Excessive customization can lead to curve-fitting.
Conclusion: Elevate Your Trading with the Zone Trade Indicator
The Zone Trade Indicator MT5 is more than just a tool—it’s a framework for disciplined, probability-driven trading. By simplifying complex market analysis and providing clear entry/exit signals, it empowers traders to make confident decisions and minimize emotional pitfalls. Whether you’re a beginner looking to build a solid foundation or an experienced trader seeking an edge, integrating the Zone Trade Indicator into your strategy can unlock new levels of profitability.
Remember, no indicator guarantees success—but with proper education, risk management, and practice, the Zone Trade Indicator can become your secret weapon in the markets. Start testing it today, and watch your trading results transform.
Support & Disclaimer
Got questions or need help? Reach out anytime:
- WhatsApp: https://wa.me/+443300272265
- Telegram: https://t.me/yoforexrobot
Disclaimer: Past performance is no guarantee of future results. All trading carries risk. Always demo-test the Zone Trade Indicator MT5 in a risk-free environment before deploying on a live account.
Comments (0)
No comments yet. Be the first to comment!
Leave a Comment